 Login
Login Register


Texture editing
Tools: TXD Workshop
Tutorial author: FunGt
TXD Workshop is one of the most useful programs for a modder because it allows to edit any TXD file of San Andreas, Vice City and GTA3. In this tutorial I'll show you how to edit the Moon texture of San Andreas, included in particle.txd file. Any other txd file can be edited in the same way.
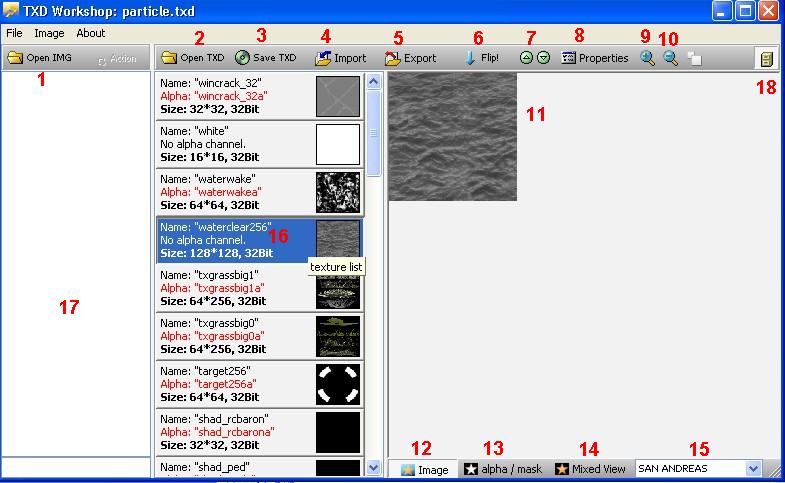
Run the program and click Open TXD and select the particle.txd file located in models folder. To make this tutorial easy I made a screenshot where I numbered all TXD Workshop options:
- Opens a IMG file.
- Opens a TXD file
- Saves the current TXD file.
- Replaces the selected image with an image from your computer (png, bmp or tga).
- Extracts the selected image in your computer (png, bmp or tga).
- Rotates the image by 180 degrees.
- Moves the image up and down in the list.
- Shows the image properties.
- Zoom the image.
- Unzoom the image.
- The selected image.
- Shows the rgb channel.
- Shows the alpha channel.
- Shows rgb and alpha channels together.
- Saves the TXD for other GTAs.
- TXD images list.
- TXD file list found into IMG file opened.
- Hides the part not used, not recently opened (txd or img).
Now let's edit a txd file. First of all we choose the image to edit. In this tutorial I'll edit the Moon image. Scroll the images and find the Moon texture (the 28th) called coronamoon. Now click Export and choose the image format (png, bmp o tga). Now you can edit the image as you want with any graphics program. The image resolution can only be a power of 2: 32, 64, 128, 256, 512, 1024 etc. Once you edited the texture, click Import and select the new image file. Now click Save TXD and close the program. Run the game and watch our new Moon.
Advice: if you want to associate the TXD files to TXD Workshop, click About>>about and then select Associate txd files with txd workshop.
The following video shows the tutorial above:

Advertisements