 Login
Login Register


How to convert a vehicle from VC to SA (fast method)
Tools: 3D Studio Max 7, Kam's Scripts and Anos Script
Tutorial author: FunGt
The following tutorial explains how to convert any vehicle from Vice City to San Andreas. This guide is based on 3D Studio Max 7 that you can download from the link above. If you convert a vehicle and you want to publish it, ask permission author before.
- Copy into a folder the dff and the txd of the VC vehicle you want to convert.
- In the same folder put a DFF of a San Andreas original vehicle. The vehicle should be similar to the vehicle you are going to convert because it will be the collision. For example if you are going to convert a Limousine, extract from gta3.img the stretch dff. Extract also its txd.
- Rename optionally the VC vehicle in vehicle_vc.dff and vehicle_vc.txd. Rename also the DFF extracted in col_sa.dff.
- Run 3D Studio Max 7, then the DFF IO.
- Click Import and select the VC vehicle to convert.
- If you are NOT converting a original VC vehicle (eg. Deluxo), skip to 10th passage.
- - Click Import and select col_sa.dff.
- - Press H and select all objects except "wheel", then press del to delete them.
- - Press H, select the wheel only, then click in this order: Unlink selection, Select and Link and Select by Name (square buttons on the top left). A window should be appeared: here select wheel_dummy_rf. Now press the arrow square button. Now skip to 12th passage.
- Press H and delete all the wheels except wheel_rf (don't delete the dummies).
- If the wheel is too big, resize it with Scale button. Once resized, press Reset XForm, then Reset Selected (buttons on the right menu, on Hammer menu).
- Press H and select all objects.
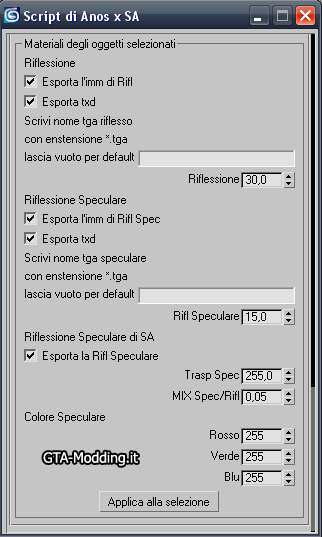
- On Anos script, that should be ran at start, scroll down the window and set the numbers like in this screenshot, then click Applica alla selezione.
- Click Select COL3/COLL on DFF IO and then select sa_col.dff.
- Click Export and give a name to your dff.
- Open with TXD Workshop the vehicle_vc.txd.
- Click Image>Compress all images (may be crash).
- If it crashes, compress each image manually. To do so, double-click on the image and and select compressed (be careful, the images with an alpha channel should be DX3, the others DX1).
- If you are NOT converting an original VC vehicle (eg. Deluxo) skip to 23th passage.
- - Open with TXD Workshop the txd file of SA vehicle used as collision.
- - Click on Image>Export all textures to bitmap.
- - Go back to VC txd, then click on File>New>32bit, then click Import and select on of the images extracted at the previous passage. Repeat this passage for each image until you've imported all images extracted.
- Select San Andreas on the bottom-right drop-down menu.
- Click Save TXD and rename the txd as the dff.
- Now you can import dff and txd to gta3.img to install the vehicle!
Known problems:
1. The wheels goes under the road:- Open vehicles.ide and increase the wheel size values (second last and third last values).
- Run 3DSM, press H, select the bugged part and click Unlink Selection.
- On the right menu called Modify, click the +, then click Element.
- Select some random parts then click on Detach below, then click OK.
- Click on Attach, press H and select Object01.
- Then select the object (not elements), click Select and Link, Select by Name and on the new window select the correct dummy for that object.
Advertisements